The Doctor will see you now...Sanctum
- Jan 2, 2023
- 4 min read
Updated: Jan 21, 2023

I wanted to paint this for a while but have kept putting it off as i wanted to do a proper job on it and get a nice weathered copper roof going on. I had recently bought the dirty Down verdigris bottle to join the rust and moss and was keen to try it out. However this is not my Sanctum, it is a commission and in the end I went to a more tried and trusted method - chipping.
First up a decent priming with black on the roof and the stonework - brickwork was brown

Next i used AK Burnt tin as a base, this is a great colour for any gold, brass or copper work. As you can see i deliberately went hard and soft in random ways as i dont need neat and irregularity is what you want for a natural look.

I then used VMC copper on the upward facing surfaces, again no real plan other than irregular, leaving plenty of dark and midtone in place. This is really quick with the airbrush.

I had also masked off the brickwork to avaoid metallic speck invasion as even though I would be going over the brickwork after those little metallic spacks can be a bastard.
This picture shows literally nothing but has in fact had two layers of chipping fluid sprayed on and left overnight. It works best when it is properly dried.
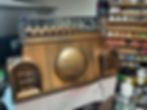
First layers of coppering now. For this i used vmc Flat Green leaving darker areas in the edges and eaves. This was a couple of passes

Two layers resulting in the nice smooth effect below

Chipping was then started using water, a stiff brush and a wooden toothpick. The colour looks different here due to the change i lighting rather than the change in colour. The areas uncovered look quite large but will not remain that way and as a guide less is always more

Areas of wear also on the flat roof...

To smooth it all out I then went back with a lighter version of the Flat Green which makes the harshness of the original chipping less.

Once completed I went over with a couple of coats of matt varnish to give some protection from later weathering with enamels.

Now the fun bit. I bodged together a mask using masking tape to cover the fretwork sybol in the sky window and sprayed a dark purple in as a base for shenanigans.
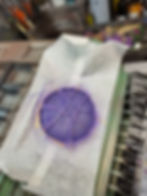
Then we went all spirally with lighter shades of purple to create a magical mystical and as it turned out slightly hippy internal event!

All good until the masking came off taking an area of paint with it....see the right lower fret. However this was soon patched up and a few star points added. The top story windows were similarly painted now.


The windows were framed in black which was was then edge highted and the corner brickwork tarted up in the same colours as I was going to use below, a game colour vermin brown and Vmc orange brown.

The trapdoor was painted in a darrk brown base and each plank painted in varaieties of earth browm, green brown and Old wood (all Vallejo). the metal was dotted with rust and silver.
Balistrades next. with a black primer it was easy work to go over in a darkened gunmetal and the highlight the upwards facing surfaces with thin silver. You could spend longer edge highlighting every one but I did not..

The completed work was then masked off in preparation for the messy airbrushing of different shades of brown, some darker and some lighter to get an impression of aged brickwork. A more patient man or one charging significantly more money might paint each brick but I am neither of those men.

Dark brown in the recesses...

Flat brown and Orange brown for interest.


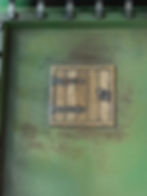
With the brickwork largely down it was time to sort the windows and I decided for a more normal grey reflective effect for these which used Dark Grey, then Field Blue and then a light grey. I am not saying this was tedious but I gnawed off my wrist part way through to escape.
Nice neutral effect though.

And as if that part was not tedious I then had to go around every rebated window frame with German Grey and paint every window frame in a dark grey as well. The stone cladding at the bottom could be masked and airbrushed but the rest was done by hand and took weeks... No it literally took weeks as I could only face doing a few windows each day for the sake of my sanity.

All this grey now needed a bit of interest and employing a piece of card as a shield I was able to spray a light grey highlight colour around everywhere that had been German Greyed. Finally felt like I was getting somewhere though.

After looking at some pictures I noticed that city buildings often have darker stains so it was time to spray some in using very thinned dark brown. These stains seem to be where rainwater runs off ledges etc and deposits soot or whatever. As a result these were added either side of each window frame. as can be seen below.

Tiny white dots were added to a number of panes of glass as points of reflection. Not all panes received these but it was still a trying part of the job.

Edge highlights were added now. These were deliberately irregular and not every single edge was highlighted, but a lot were!

At this point I added more grime under the window frames for a bit more contrast and a layer of street dust around the base of the building. You can see these effects in the pictures below.

All that remains is to spray in the light effect on the lamps. I am still in several minds about this as to whether it should be standard yellowy ar maybe a greeny 'weird' light. Standard it is.

All these techniques apply to any building really, mcp or otherwise. Key thing is if you are painting buildings get an airbrush!

