Nordland steamtank - or how to paint yellow without tears (with a small Crisis Protocol update )
- May 29, 2021
- 4 min read
Updated: May 13, 2022

Built and painted 9 steamtanks and a Hurricanum for a recent commission and thought it might be useful to show how I do Yellows. To be honest I never realised people struggled with yellow until recently as It is really straightforward as long as you prepare the base.

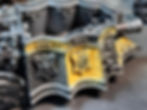
First step is to undercoat white, so obviously as you can see here I undercoated black. This was because the majority of the tank needs black undercoat so instead as visible i then sprayed white onto all the areas which would be yellow. I'm not a scientist (or in fact expert in anything) but clearly most yellows (and oranges) are pretty thin and do not go on well over any undercoat darker than cream. This is basically the key to painting yellows. Don't put it on over any colour significantly darker than yellow!
Also whenever you can spray the white on as yellows will be transparent enough to show brushmarks and irregularities in the white!

As you can see in the photo above I also sprayed those areas which were metals with a dark gunmetal made of aluminum and black to save time and remove the risk of metallic particle drift. I find that mtals have a tendency to shed tint particles when spraying which can bind to existing paintwork.
Next up was an actual yellow GW averland sunset. I dont use GW paints normally but this is one of two exceptions. It is not really a yellow being more a yellow ochre but it is thicker than the usual yellows and is a really good base over the white when thinned for the airbrush with flow improver. Once dry this was sprayed with signal yellow for the result below

To add some depth ice yellow was sprayed along the raised areas and a small amout of the yellow ochre with a smidge of flat brown into the dip. Bit washed out in this mobile phone photo but will be more visible later. Finally a couple of coats of matt varnish were sprayed on to allow for clean up if necessary. Spray paint goes on in VERY thin coats and needs regular varnish protection.
And thats it for yellow - easy paesy lemon squeezy. The rest is about how I went about the remainder of the Steamtank starting with the Blue.
This is started with Dark Prussian Blue and lightened up via Flat Blue and highlighted with a bit of Ivory added to the flat blue. These were sprayed on using the unique shape of the steam tank and my finger to avoid overspill onto the yellow. I dont remember any happening but the hefty coat of varnish applied at the end of the yellow stage would have made it quick and easy to remedy.

Next step was to do a bit of highlighting on the metallics with some Aluminium on the upper areas of the turrets, pipes and guns to get the last of the airbrush work out of the way. This is quite subtle as we are not looking at shiny armour here just the impression of metal.

With the metal done i painted in the wooden areas using Flat brown. On some of the sets of steamtanks i also gloss varnished and washed the wood with dark tone to bring out the grain but I didn't on these as i wanted the yellow blue combo to be the main draw. It is a quick win though if you do have areas of wood to paint and i did use it on the upper deck area to tone down the wood.

So this is where we are up to at this point looking at the gilding and brasswork. I have started using the Greenstuffworld pigments for bronze/copper gold metals. These are excellent as literally tiny amounts of pigment mixed with a bit of flow improver create a genuinely metallic appearance. This doesn't come across in photographs as well as in real life sadly. The pigments can be mixed with other acrylics or inks to darken or colour them. In this picture you can see I have started with darkened versions of the colours on the turret lids and smoke stacks.


I also used darkened versions of Antique gold for the first layers of metalwork on the decorative elements mixing with black ink. This layer was then overpainted and blended with Antique Gold and highlighted with pure gold. I think it produces a pretty cool effect and is very versatile.
The tanks were finished off by painting the heraldry which is also very straightforward. I brush on a dark base colour of whatever shield colour i need then airbrush in some lighter shades around the edges using fingers, paper or a blob of bluetac to protect the underneath. Edge highlights and whatever the raised symbol then added.
The Names were all from the customers family or chosen by me from the Audiobook I was listening to whilst painting. Luckily this was Dan Jones "Crusaders" so many suitable and thematic names were available. Might have been a different outcome had i still been listening to Michael Woods History of China!!
As an aside I wholly recommend this book as a corrective to anyone who was taught the Richard the lionheart and 'brave christian nobles' version as a child.


Hopefully been of some use and if not at least you have a good reading/listening recommendation! More steamtank pictures available here in Altdorf and Nuln colours https://www.firstcommissionpainting.co.uk/photo-albums
MCP update
After I finished writing this blog I painted these MCP guys using exactly the same method and technique so thought I'd add them in for completeness


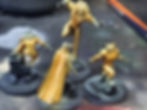


Still working on these guys but yellow sorted.