MCP Saving the planet a bit more again
- Apr 24, 2021
- 3 min read
Updated: May 13, 2022
Just finished up a Marvel Crisis Protocol job and after I posted some snaps on the MCP forum I received a couple of requests on explaining how i painted them. So having a few more to paint I managed to remember to take some pics on my phone as i went along. This has the advantage of being quick and the disadvantage of the colours not always being exactly as real life. All paints are Vallejo Model Colour thinned with Flow improver.

Firstly I use an airbrush and these minis seem to be designed for the airbrush. I noticed straight away that on the atomic mass website the gallery pics are not done with an airbrush and i can only assume that this was to show that if you are a really good painter you can get good results without an airbrush. However for the rest of us who are not premier league painters i would say that airbrush is the way to go.
Military Green is sprayed on first into every nook and cranny over the black primer. It will be the shadow colour on both figures even though subsequent colours will vary.

Mr Dwarf here then had some light olive green added in to the Military Green to start highlighting the muscles. When you do this try to highlight the upper parts of the muscles leaving the lower prats darker. This will result in some definition between muscles that you then dont have to paint in and looks as natural as enormous green muscles can be!
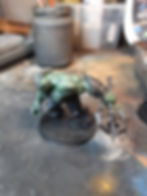
Adding in more light olive and then some Dark Yellow (Dunkelgelb) to really get the shading going. Doesn't matter if if goes over the other areas not yet painted as we will recover them in black once we are done.


Final highligh has a bit of ice yellow in the mix. There are no set ratios in this as long as its lighter then the previous colour!

The same process was used on Hulk here except US army uniform green and german camo bright green was used as he is a greener green like a pea than Black dwarf who is a yellower olive green. All the existing paintwork then got a matt varnish for protection.
Both figures then had all their unpainted bits repainted black and the second stage of airbrushing begun. Hulk had the remains of his elastipants painted dark violet by hand as i didnt want to overspray onto the existing greenwork. Any small mistakes could be cleaned off because the varnish was in place. Once dry white went into the violet and highlights sprayed on the upper surfaces in several passes.

With Black Dwarf the process was slightly different as i was able to airbrsh the base coat of Prussian blue with a smidge of black as the edges were more separated.

This was then successively spray highlighted by adding flat blue, pastel blue and white to the mix. quite harsh highlights were added to whatever the trouser plates are meant to be. That was then the end of the airbrushing of the figures.
Edge highlights were added sparingly and the metal painted with successive mixes of black with increasing amounts of aluminium
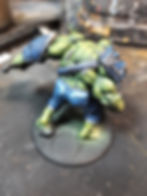

Axe highlights were painted using the fantastic new pure metal pigment paint from greenstuffworld. This paint is a real step forward and can be mixed with whatever ink and acrylic you want but because it is essentially metallic gives a much sharper metallic effect.
Also note the longtitudinal highlight down the armour on the arm.

And here are the finished guys. Bases were airbrushed with flat earth, desert yellow and dark sand as per my Infinity bases.


Are these the best painted MCP figures ever? clearly no. However they are as my motto goes, "not the best, not the cheapest but quite good value for the money!"