Painting a Burrows and Badgers Routier Bulldog
- Nov 14, 2025
- 5 min read

Some of you will have read the first series of Batreps I made for the BaB Premier League featuring four crews, Pirate Rogues, Highlands Hillfolk, Freebeasts and Royalists. If you haven't, the first in the series can be found here ... https://www.firstcommissionpainting.co.uk/single-post/burrows-and-badgers-npl-game-1-royalists-v-hillfolk-tis-the-soldier-s-life-to-have-their-balmy-s and the others follow it.
However I also decided that I would do exactly the same but with a sort of second division made of four new crews, Undead, Kindred, Wildlings and Routiers. Then at the end of each season of games there would be relegation and promotion to spice things up before the next season. This chap is from The Routiers warband and as with all the warbands is painted with Speedy type paints and then worked up with standard acrylics. This is a bit faster than the method I use for commercial work and is more than good enough for my own toys!
Step one is as seen in a million slapchop videos a black undercoat the another spray over with light grey or white just leaving the black in the deepest cracks and if you need to see what this looks like then here is an example...
As I have become more used to the method i have begun to start with more and more white and considerably less black. I find that other than the very deepest creases a mid grey is as dark asI want to work with. A solid drybrush with white will also pick out the relly top highlights as can be seen with this guy below. I have also added a nice bright red as using speedy paints its best to start with what you think will be your medium base colour - you can then use darker speedy paints to add shadow or normal acrylics as highlights.

I then added what I thought would be the medium blue but as it turned out it became the shadow colour so win some, lose some. On the shield you can see I thinned it a bit towards the top making it lighter.

I then decided as usual to work up the face. I still tend to take the advice from an old Airfix modelling book from probably the 70's to work from inside out starting with the face. This was a colour called bony something or other and was thinned as I wanted the bulldog to look like the one on the internet which was overall a cream colour with browny red patches so just essentially a wash into the texture.

Then to catch the texture I did the old drybrush cheat using ivory or creamy white. Quite hard to see a massive difference on my phone camera but it has lightened up quite a bit!

Still using the internet image I then added some pink around the nose and mouth which were then washe over largely with a thinned down black speedy paint - a Vallejo Xpress I think. I use both Speedpaints and Xpress paints alongside eachother as both have nice colours. You can just see the pinky effect on his jowls beneath the thin black. The patches were added with Speedpaint Ruddy Fur.

Again following my reference pic i painted the eyes ith a creamy eyeball followed by a VMC flat brown iris and a VMC black pupil. On my reference they sort of merge together and I dont think I have ever looked close at a dog's eye in real life so that is what I did. The dot highlight adds artificial wet shine as on the nose which I believe is wet also. Teeth added in sand then cream highlights.
I also used a light leather colour on the waistbelt and pouch and a colour called Satchel brown on the over the shoulder belt.

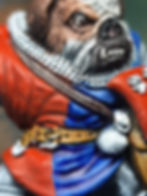
Face done it was time to work on the clothes, The blue was highlighted using Vallejo Model colors (VMC) on the folds first with a medium flat blue and then with a bit of white added to it for top highlights. The criss cross effect on the folds is completely not essential and just to add a bit of texture at a distance. Take it or leave it. If I was working on a 75mm mini for a customer I would do a lot more but as it is just for me its good enough.

The red side was single highlight with vmc Scarlet and a darker red speedy paint used in the creases and shadows. No criss cross texture here as it doesnt show as well so not worth the trouble! You can see the brown/black eye thing I was talking about a bit better here.

And even better in this close up! The edge texture on the belt also looks terrible in this picture but is worth doing as at normal size it really helps to define the belts. On the dark brown belt the top edge highlight is not brown at all but is a light khaki drill. If you find it getting too harsh as a highlight just use a thinned down wash of the original speedy paint over it.
All the soon to be metallic steel armour was now painted in with vmc black as the way i do it needs more than a speedy basecoat. I also appear to have forgotten his little purse full of doggy treats at this point.

As a first stage I use a sort of gunmetal dull metallic steel leaving dark areas in the shadowss. I have a fast method using 2 brushes one which pops on the paint in the top area, the sort of broad highlight area and a second damp brush which blends it down to the blackest areas getting darker as it goes. I have an old blog on the method here.....https://www.firstcommissionpainting.co.uk/single-post/armour-plated

Then using the same two brush method i added the highlight in slighlty smaller areas. My armour silver of choice is actually Vallejo Model Air Aluminium simply because it blends beautifully being a tad thinner than the VMC. There are lots of better ways to paint good armour but not many faster!

Unsurprisingly the bronze/gold metallics have the same method. This time i use an AK 3rd gen colour called Burnt Tin as the dark base and if you think it is not dark enough a bit of vmc German dark brown will take it right down but not change it,s essential hue.

For the Bronze looking mace I used the same AK Burnt Tin mixed with AK Old Gold as the first highlight then added in some Aluminium for the top highlight. Again the old two brush method blends everthing together effectively.
It also appears that at this point I added some basing material to cover the base - This would be the same AK dark Earth I use to base anything on a puddle base.


At this point I also painted his little purse that I had forgotten which looks a bit rough in theis pic which is at about 500% actual size but is fine at normal distance!

Once the basing paste was dry I drybrushed it with vmc Desert yellow and Dark Sand and added some tufts. The flowers are purchased but the ordinary tufts are made by myself in large batches as described here. https://www.firstcommissionpainting.co.uk/single-post/the-tufty-club-making-tufts-for-basing

And from starting with the red to painting a black rim this Bulldog was completed in under 3 hours which I am happy with for a nice mini for me to play with. Obviously you could spend a lot longer on it making it much better if that is your aim, but for me personally, as with all my speedy paint minis the object is getting decent quality on the table in a manageable amount of time!