Now you see it now you don't - Painting Modern British Camouflage
- Sep 23, 2022
- 3 min read
I recently completed another eclectic job for a South Korean customer of which part was the painting up of these White Dragon modern British, Before I describe the process I have to say these minis are exceptional in every way from, anatomy and detail to printing. A real treat to paint!

Camouflage painting on miniatures is a strange beast. I have said it before but there is no point attempting to paint an exact replica of the pattern as not only would that be hideously difficult, time consuming and expensive to the buyer but would not look right due to scale differences. What you need to do is paint something which looks right at 28mm and still stands out as camouflage! See here https://www.firstcommissionpainting.co.uk/single-post/2019/11/12/how-i-paint-waffen-ss-oak-leaf-camouflage-and-pea-dot and here https://www.firstcommissionpainting.co.uk/single-post/rapidish-rauchtarnmuster .
The modern British camo being represented here is hideously complex in real life and so what we have here is how I went about recreating a version of it. Firstly the minis were undercoated dark brown (stynlrez primer ebony) and then sprayed with ak 3rd gen Green Brown as the basis for the camo.

A little Vallejo pale sand was then added to the green brown and sprayed on to the upper surfaces as highlight. This is more apparent in real life than on my phone camera apparently....

Then using reference pics off the internet I used Vallejo American Dark Green to apply irregular patches which were longer in the side to side axis than the uppy down axis. Apologies for the technical language. When applying these I think it looks both cool and realistic to end the patch where pieces of fabric such as sleeves or pockets join as in real life the pattern would be disrupted here. You can see this on the right shoulder and left sleeve below.

The same approach was then taken with the brown patches as seen below. The colour was German Pale Brown as used in German WW2 camo. This is lighter than the real brown which is necessary for the next stage to work properly. The same sidey sidey, uppy downy rules were applied.

The paler brown was necessary because the next step was the addition of the dark brown/black lines. These were applied in a slightly swirly fashion and very thin as this was the way they appeared on the real camo. Of course on the real camo there were more and thinner but exact replication would make them virtually invisible here. If the brown had been as dark as in real life then these lines would similarly be less visible.

Tiny Weeny lines and swirls of pale sand were the final element of the scheme. These range from small to tiny on the real camo so again are abstracted here to produce the effect rather than then actuality. Dont go mad here, it it easy to overdo the pale bits. Less is more.

With the camo done it was time to do the rest. Faces were based flat brown and highlighted up with flat flesh whilst guns were blacked in. At this point I realised the back parts of the knee pads also had the camo pattern so had to start again with those...grrr.

The edges of the weapons were highlighted in light grey and boots and gloves painted desert yellow. gloves also got a quick light brown wash and then the fingers highlighted again. Helmet straps and loose webbing were painted dark green then highlighted in a lighter green and the tops of the knee pads had a highlight blended in to the upper half of each pad of the original ak green brown / pale sand mix as were the straps on top of the helmets.
Bases were PVA / B&Q sharp sanded as usual, varnished then painted in Wilko brown paint and drybrushed!
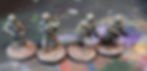
Below are the finished Dismounted vehicle crews as I believe the pack is listed.


This looks like a pretty complex pattern and experts amongst readers will easily be able to see the compromises and fudges but for the relatively short time involved (and therefore the lesser expense to the customer) I was pretty pleased with the final result.